This is my very first completed game! This is a simple, fetch-quest game with no end. You harvest crops and collect fruits to fulfil the tasks that a mailbox gives you :) 

Controls: WASD or Arrow keys to move. Space to interact. Tab to open the task bar. Esc to pause

  ***update: the 'quit' button doesn't work on web format**


Background info:

I barely have coding knowledge (since I'm a music major), but I really wanted to learn. I decided to make a game using Godot 4. I tried to challenge myself to make this in 2 weeks, but I ended up finishing in about 17 days. Learning everything from scratch was a little difficult Godot 4 is a complete overhaul from previous versions, so most of the tutorials I could find were either outdated or way too few for what I needed.

Despite it all, I think I still managed to create something I am super proud of!! Here are some of the features that I successfully learned and implemented:

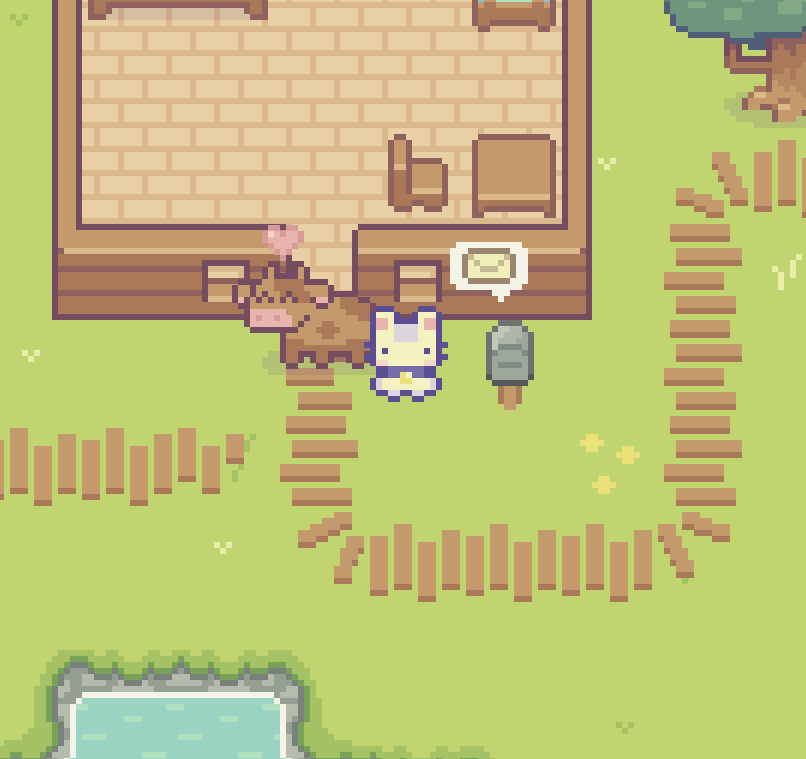
  • Character movement and toggling between the actions 
  • Crop and tree animations
  • Tilemap layering and collisions (I had multiple layers)
  • Walking under bridges (why I created multiple layers lol)
  • Counter for resources collected
  • Having a task system that would generate random tasks (a pain in the butt)
  • COWS WITH RANDOM ANIMATIONS <3
  • Radial menus that change locations depending on the object
  • Toggling the seed inventory button (animating with Tweens!)
  • Instantiating any crop you want to plant
  • Main menu and Tutorial "levels" (nearly broke everything)
  • Pausing the game
  • Dialogue with the dialogue manager plug-in
  • Workstation that can take one crop and turn into multiple seeds

I normally make my own assets, but since my goal was to learn to code, I used the lovely Sprout Lands- Asset Pack by Cup Nooble (https://cupnooble.itch.io/) Go support them!! The assets are AMAZING. 

I will also be adding audio later lol! 


Comments

Log in with itch.io to leave a comment.

(1 edit)

i was scrolling through most recent web games, and saw this! really really impressive first project in godot for 17 days!

i do have an ulterior motive for commenting though...i've been having difficulties finding godot 4 resources for the same reasons you listed lol. have any recommendations?

(1 edit) (+1)

Hello! Thank you for your lovely comments! I won't gatekeep so be prepared for a TON of links:

Starting with the videos I used (not everything, but the main ones that worked for me):

  • Oeerall tuorial: I first got started with Chris' Tutorials. He posted a crash course for beginners that I found very helpful. I used this as a test to just mess with the mechanics. My code ended up looking way different, but I still liked the tutorial
  • Overall tutorial: I would also look at his Harvesting Resources videos. I found those to be useful when I wanted to figure out how to harvest the resources. 
  • Overall tutorial: Basically all of Maker Tech's videos. Definitely should have started with this, but I think it still turned out well! 
  • Overall tutorial: Another tutorial I found super super helpful was the 2D RPG mini series from Jean Makes Games2D RPG mini series from Jean Makes Games. It's not complete as it was fully published on Udemy, but I didn't really need to use the other features anyways. I'm pretty sure this was the basis of my whole game.
  • Overall tutorial: While this playlist is almost 3 years old, I absolutely loved BornCG's Godot 3.2 tutorials. I specifically loved the coin collecting video since in my game, I had to collect items. Probably the best teacher out of all the videos I watched. Sure, you may have to reformat some stuff for Godot 4, but because he explained everything really well, I was able to expand on what he did. Lowkey might try to make his cool platformer but on Godot 4
  • Signals: Basically anything from Brett Makes Games is good! I know I used several videos from his! But I remember using his signals video a lot!!!!!!
  • Collisions and signals: Queble's Interaction Tutorial was helpful for me to learn about collisions and signals since I knew I would have to interact with a bunch of things in the game. If you need to do something similar, I would experiment with area collisions/masks and signals. 
  • Collisions and masks: I found this video extremely helpful to explain the difference. I constantly mixed them up! Basically collisions are what it is and masks are what it's looking for. In my case, I had an area node under my player that was only toggled whenever the space button was pressed. Then, when it was toggled, I had an area node attached to my crops that would look for it to then move on. In that case, the node on the player was under the "action" collision layer that was under the "action receiver" mask layer. Likewise, the crop area was an "action receiver" collision layer but masked for the "action".
  • Control nodes: I needed to make an inventory for whenever I collected anything, so I used this tutorial to get the basics of the control nodes. Very useful information on the margin containers, the VBox and the HBox containers! Some stuff didn't really make sense for me, but I did a bit of fiddling around and it worked!
  • Dialogue: If you need dialogue, you NEED to download Nathan Hoad's Dialogue Manager plug-in! Here are his videos explaining the basis of it. Honestly super inspirational! 
  • Dialogue: DevWorm made several videos with Godot4, but I used his Dialogue System video since I wanted a slower explaination of the Dialogue Manager. He goofs up a bit, but I think it was really nice to see someone not perfect!
  • Tweening: One of the things I wanted to create was a radial menu. I first saw it on this website, but the problem is that the Tween node no longer exists on Godot4. Luckily I found two videos that were SUPER helpful in explaining it to me. This one from Bramwell goes over the basics, and this one from Queble is more recent and definitely goes more in-depth. So all I did was take the information I learned from these videos and try to replicate what I wanted from the website. I ended up not making it radial for location reasons, but I definitely left in the animations because it looks so damn cool!
  • Instantiating: I needed to learn how to instantiate a scene (in my case, my crops), so I used this video by JumboGames for the basics of it. You might have to fiddle around with whether or not you have to preload the scene. The documentation says that preloading has better performance, but I can't tell because my game isn't very intense haha.
  • Timers: One of the main features of the task system I made was to use a timer for the mailbox. You would need a timer node to do this (from what I know), but it's not extremely difficult to figure out!I used this video from Gwizz to help me understand it.
  • State machines: MY COWS caused me so many issues (partly because I decided to implement them very early on so I wasn't yet comfortable with coding). I basically had to make a state machine that the cows would randomly flip through. I ended up making an enum of states that I learned from Jean Makes Games as well this super recent video by Bitlytic when it comes to enemies following you
  • Pausing: I don't know why it was difficult for me to pause the game, but I eventually figured it out. It turns out you don't need a lot of code for it (only 3 main functions for the escape key and the two buttons). I pretty much used several videos and just fiddled around until it worked. If you want the barebones, use this video by GDQuest. I pretty much used this for the actual pausing of the game. For the buttons, I really liked this video by rayuse rp! But since that video is a little outdated, I used this video from Chris' Tutorials for explain it further. All in all, I used less than 30 lines of code just to pause the game haha
  • Menus: About menus, I definitely used this Gwizz video to explain how the main menu works. I'm pretty sure this was probably the simplest thing to implement lmao. 
  • Autotiling: Autotiling was confusing, but this video by MmmmmmmmmmmmmmmmmmmDonuts was SUPER SUPER helpful and he explained it better than anyone! 1000% needs more views. 


Now for the little tips I learned as a complete beginner (not the most efficient, but I'm learning lol) I'm not sure what your level in coding is, but I will just write these for anyone. These are not in order of when I learned them:

  • Disabling collisions: I struggled with going under a bridge, and while I did create alternate tiles, I had to also mess around with collision areas that would look for the player. If the player was in contact with the area, their collision would be turned off.  If they left that area, their collision would turn back on. The same went for going on the bridges where I would collide with the edge of the ground below it. Obviously this was a little fiddly, but I will experiment with it next time. 
  • Changing z index: To continue with this, because I needed to go over and under the bridges, The bridges needed to be on a higher z index to be displayed above the character. For this I created two separate tile maps (level 1 and 2). Level 2 was at a much higher z index than level one, so I needed to change the player's z index once they reached level two. To get around this, I had two areas on the ramp that connected the two levels. When you go up the ramp, your z index would change to 10, and if you went down the ramp, it would go back to 0. I put these areas next to each other on the bottom of the ramp
  • Global variables with autoloading: Because I instantiated objects, they wouldn't be able to connect to signals that well (or maybe I just didn't know how to). I had to autoload a global script that the other scripts could access. **I was told that this was bad practice as global variables could cause issues.** Yes it made things slightly complicated, but since I didn't know any other way, this is what I used. 
  • Y-sorting: If you have y-sorting enabled for a node, make sure the parents also have this enabled. I wasted like an hour trying to fix my stuff only to find out I just had to check a box.
  • Drawing out stuff: Because what I had to do involved a lot of steps, I often found that drawing out the loop on a piece of paper helped me walk through the steps I needed to go through to implement what I wanted. This was super helpful when I created my task system that would randomize.
  • Canvas layer positioning: If you're using the canvas layer to position things and you want it to show up at a certain location, if you use the location of the specific node in the tree, it won't work properly because the canvas layer is super stretched out. Instead, I added different Vector2 locations together to get where I needed to go. Since I wanted my buttons to be in a sort of round shape, I calculated the location of each button around (0,0). Then I added that position to the position of the node I was trying to connect it to. Because of the alignment, I ended up adding another Vector2 location as an offset for each. This was a long process but I'm not sure of another way around it. 
  • Print and Breakpoints: Putting print statements will help you see what's happening, while breakpoints will show you where something is happening. Don't be like me and put print statements everywhere (especially in the _process(delta) function). You might crash Godot because the debug is printing like over a million things. 
  • Peptalk: Also, don't beat yourself if it's not perfect or efficient. You will learn and get better along the way! Definitely had to give myself that pep talk often. 
  • Breaks: The biggest tip I learned is to take a break once in a while. I'm the type of person to power through, but after taking breaks, I found that I could often solve through my problems almost instantly. Don't be like me and try to make a game as a complete beginner on a time crunch. You will be stressed lmao.

If you made it to the end of this, I wish you good luck on making your game!! Obviously, if you ever have any more questions and comments, I would be happy to answer and learn.

(1 edit)

this is amaaaazing! i wasn't really expecting a lot, and this is absolutely fantastic. read the whole thing and am definitely going to be returning to read it more as i keep learning - literally cannot thank you enough

congrats again on this project from its state machine cows to wrangling the bridges! it feels great, and i wish you the best of luck on future projects - i'll keep an eye out!